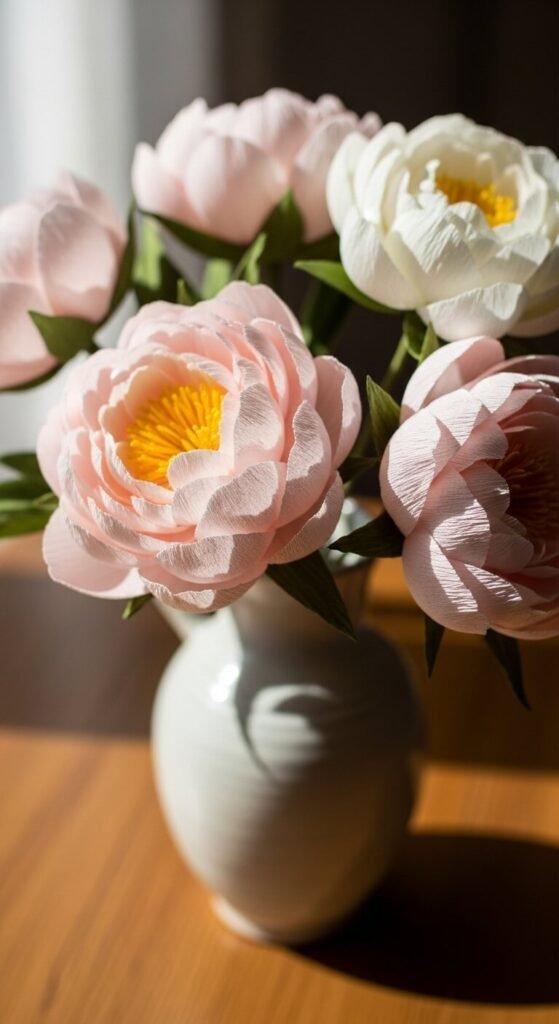
Picture this: You walk into a room filled with gorgeous blooms—peonies, roses, ranunculus—and lean in to catch their scent. But wait. They’re paper. And they’re so convincing, you had to touch them to be sure.
That’s the magic of realistic paper flowers. They don’t wilt, they don’t need water, and honestly? They can look even better than the real thing. Whether you’re planning a wedding on a budget, decorating your home, or just want a creative outlet that produces stunning results, making lifelike paper flowers is easier than you think.
Let me show you exactly how to craft blooms so realistic, your guests will do a double-take.
Why Paper Flowers Look Fake (And How to Avoid It)
Most paper flowers scream “craft project” because they make a few critical mistakes:
- Using the wrong paper – Regular construction paper is too stiff and uniform
- Perfect, symmetrical petals – Real flowers are beautifully imperfect
- Flat coloring – Nature uses gradients, shadows, and depth
- Rigid stems – Real stems have texture and slight curves
Once you understand what makes flowers look real, you can reverse-engineer perfection.
The Secret Ingredient: Choose the Right Paper
Here’s where most people go wrong right out of the gate. The paper you choose will make or break your flowers.
Your best options:
- Crepe paper (specifically Italian or German crepe) – It has natural stretch and texture that mimics real petals
- Mulberry paper – Delicate and fibrous, perfect for translucent petals like poppies
- Cardstock – Use only for sturdy flowers like succulents or magnolias
Avoid regular tissue paper or craft paper. They lack the body and texture you need for realistic results.

Master the Art of Petal Shaping
Real petals aren’t flat. They curve, cup, and twist in organic ways. This is where the magic happens.
The cupping technique: Place your cut petal in the palm of your hand and use your thumbs to gently stretch the center outward. This creates that natural cup shape you see in roses and peonies.
The edge curl: Hold the petal edge between your thumb and a pencil or dowel, then gently pull. This creates those delicate ruffled edges found in ranunculus and carnations.
The vein press: For leaves and some petals, fold the paper in half and press along the fold to create a realistic center vein.
Add Depth With Color Layering
Here’s the game-changer: Real flowers aren’t one solid color. They have darker centers, lighter edges, and subtle color variations throughout.
Try these techniques:
- Chalk pastels – Blend colors at petal bases and edges for soft gradients
- Watercolor – Lightly wash petals for translucent effects
- Ink pads – Dab edges for deeper color concentration
- Acrylic paint (heavily diluted) – Add tiny spots and imperfections
Start light and build up. You can always add more color, but you can’t take it away.

Construct Your Flower Like Nature Would
Assembly order matters. Real flowers bloom from the inside out, and your paper version should too.
The basic process:
- Start with the center – Create stamens using floral tape and wire, or craft a small bud center
- Add the innermost petals – These are usually smaller and more tightly cupped
- Build outward – Gradually increase petal size as you add layers
- Offset each layer – Don’t line up petals perfectly; stagger them naturally
- Secure with floral tape – Wrap tightly, stretching the tape as you go

The Finishing Touches That Sell the Illusion
The difference between “pretty” and “Is that real?!” comes down to these final details:
Stems and leaves:
- Wrap wire stems with floral tape in natural brown or green
- Add slight curves—real stems aren’t perfectly straight
- Attach leaves at realistic angles with visible “nodes”
Imperfections:
- Slightly bend or tear a petal edge here and there
- Add tiny brown spots with a fine-tip marker
- Let some petals overlap irregularly
Dusting:
- Lightly dust the entire flower with chalk or eyeshadow for a matte, natural finish
- Add a whisper of shimmer to petal tips for morning dew effect (optional, and use sparingly!)

Ready to Fool Everyone?
Making realistic paper flowers is part art, part science, and entirely addictive. Once you nail your first bloom, you’ll want to create entire gardens.
The key is in the details: the right paper, organic shaping, layered colors, and those beautiful imperfections that make nature so captivating.
Start with one flower type—roses or peonies are beginner-friendly—and practice until you’ve got the technique down. Then expand your garden from there.
Save this guide and give it a try! Your first realistic paper flower is just a few folds and curls away. And trust me, the look on people’s faces when they realize they’re not real? Totally worth it.