Decorating eggs doesn’t have to mean dipping them in pastel dye and calling it a day. Whether you’re prepping for Easter, hosting a craft night, or just looking for a fun weekend project, there are so many ways to make eggs look genuinely stunning — without spending a lot of money. From pressed flowers to marbled nail polish, these ideas are doable for all skill levels. Some take five minutes. Others take an afternoon. All of them look far better than anything from a box kit.
1. Pressed Flower Decoupage Eggs
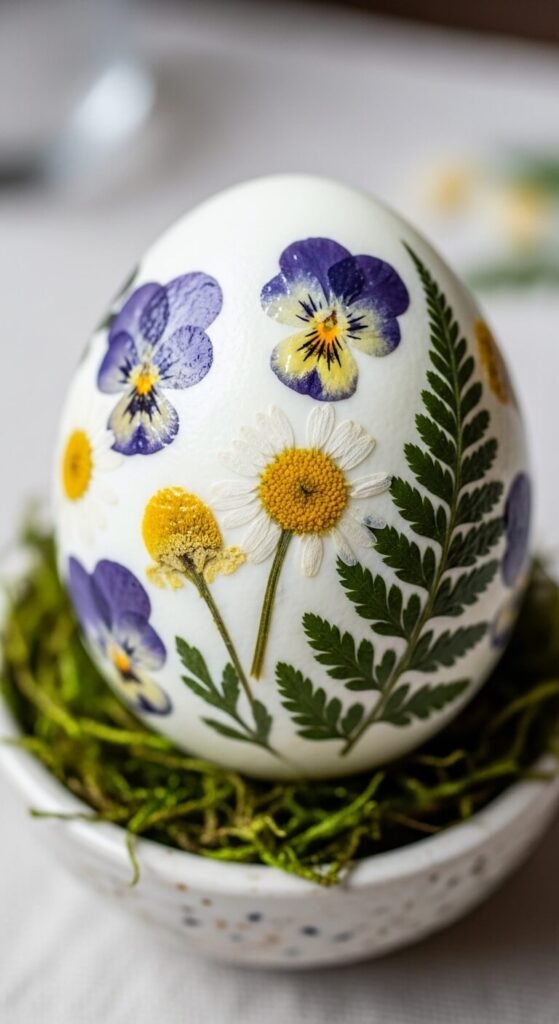
Pick up a pack of dried pressed flowers from a craft store — or press your own between book pages for a week. Apply a thin layer of Mod Podge to the egg, press the flowers on gently, then seal with another coat. Let it dry completely. The result looks delicate and almost antique. Great for display eggs or wooden eggs you can reuse every year. Budget: under $5 if you use flowers from your yard.
2. Nail Polish Marble Eggs
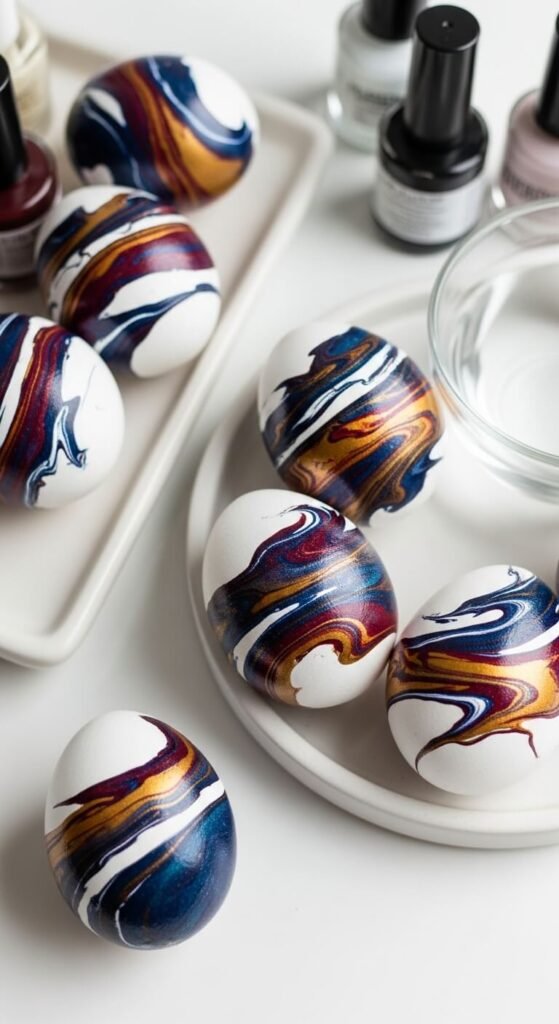
Fill a disposable cup with water. Drop a few colors of nail polish on the surface and swirl with a toothpick. Roll a hard-boiled or blown egg through the pattern. Pull it out and let it dry. Each egg turns out completely one-of-a-kind. Dark polish colors like navy or emerald look especially dramatic. Use gloves — this gets messy fast. Total cost: just old nail polish you already own.
3. Watercolor Wash Eggs
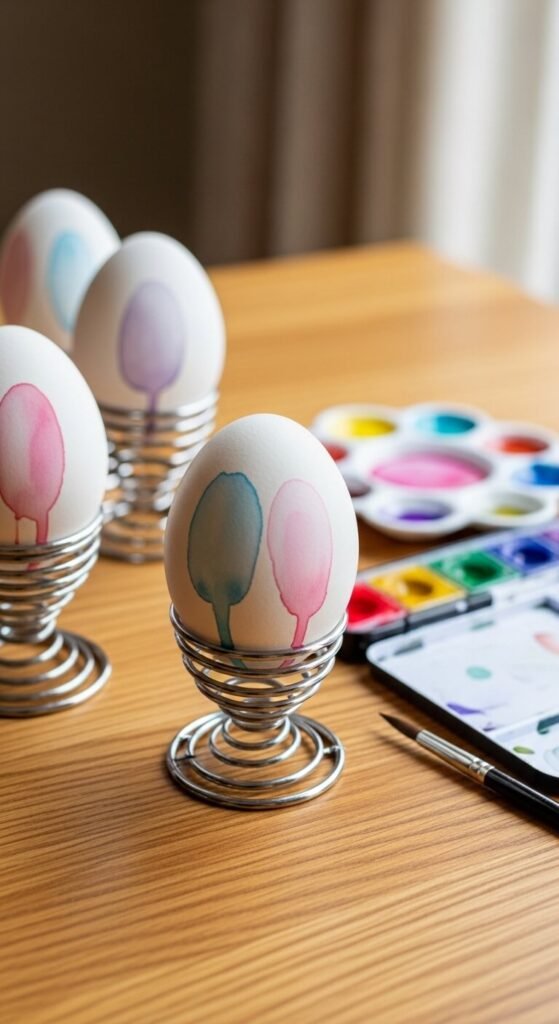
You don’t need to be an artist for this one. Grab a basic watercolor set and load your brush with plenty of water and pigment. Paint loose washes over a blown egg or a hard-boiled egg. Let colors bleed into each other naturally — that’s the look you want. No precision required. The more imperfect, the better. Finish with a matte sealant spray to protect the color. Budget: a $4 watercolor set works perfectly.
4. Washi Tape Geometric Eggs
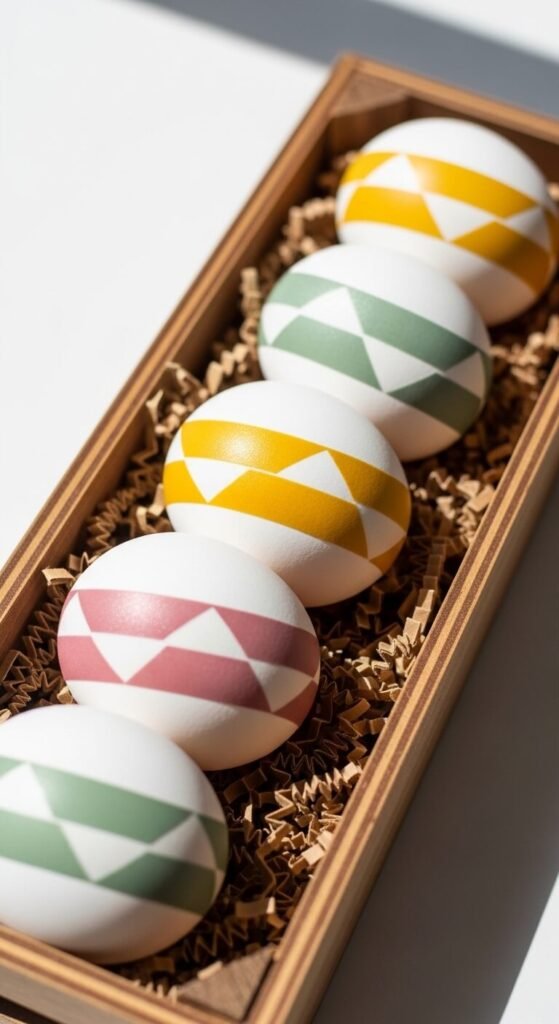
Washi tape comes in hundreds of patterns and colors, and it sticks to eggs surprisingly well. Cut strips into triangles, chevrons, or diagonal bands. Press them down firmly, smoothing out bubbles as you go. Mix solid colors with patterned tape for more visual interest. This is a zero-mess option — perfect for kids or anyone who doesn’t want to deal with dye. A roll of washi tape costs about $2–3 at most craft stores.
5. Gold Leaf Crackle Eggs
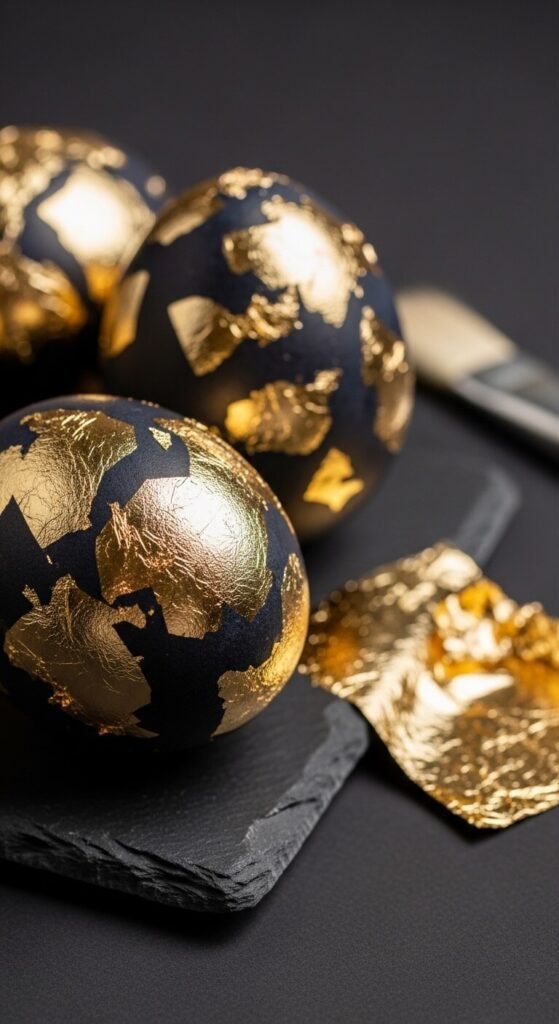
Paint your egg with black or navy acrylic paint first. Let it dry completely. Then apply a thin layer of craft glue to sections of the egg and press on gold leaf sheets. The leaf will crack and break naturally, giving a dramatic crackled effect. It looks expensive but costs almost nothing. Imitation gold leaf packs are available for about $5 and contain dozens of sheets. One pack makes many eggs.
6. Rubber Band Dye Resist Eggs
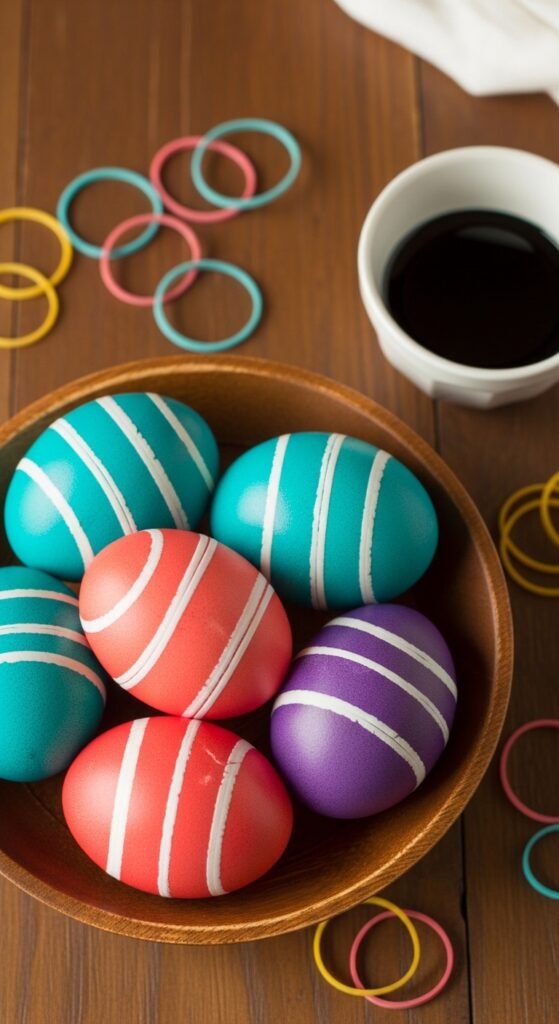
Wrap rubber bands tightly around an egg in any pattern before dipping it in dye. The bands block the dye and leave clean white lines where they were. Try wrapping bands in parallel lines, Xs, or random criss-cross patterns. Remove bands after drying to reveal the design. Layer two dye colors for more complex results. This technique works with standard egg dye kits — no extra supplies needed.
7. Crayon Resist Hot Wax Eggs
Draw designs on a white egg with a white or light-colored crayon before dyeing. The wax resists the dye, leaving your drawing visible in white against the color. Simple shapes like stars, dots, hearts, and initials work really well. Press firmly with the crayon for a stronger resist. Kids love this method because it’s like drawing on eggs. Works with any standard grocery store egg dye kit.
8. Speckled Robin’s Egg Look
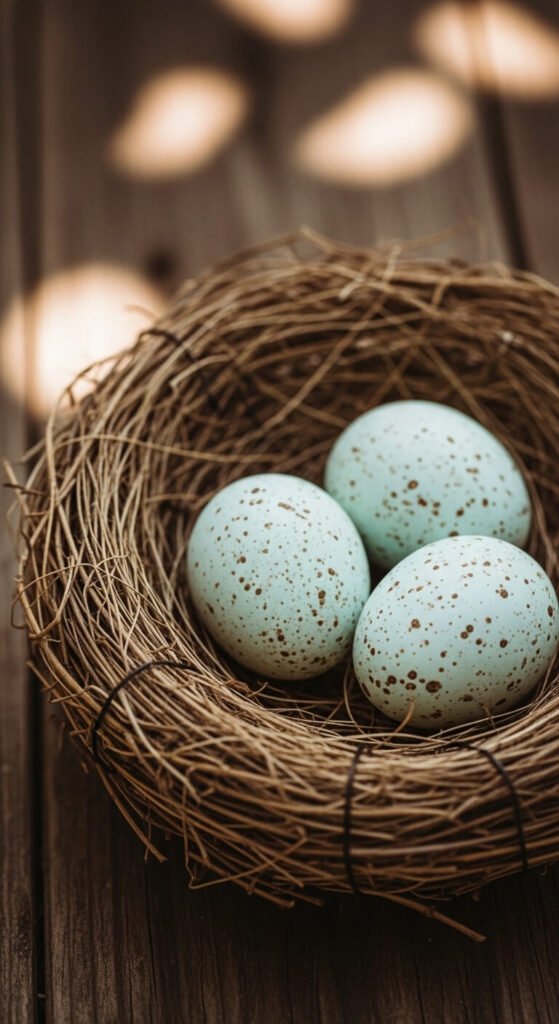
Dye your eggs light blue or teal first. Then dip an old toothbrush into brown or black watered-down paint. Hold the toothbrush a few inches from the egg and drag your thumb across the bristles to flick tiny paint droplets onto the surface. This creates an organic speckled effect that looks almost real. Practice the flicking motion on paper first. Done right, these look like genuine robin eggs from nature.
9. Ombre Gradient Dip Eggs

For an ombre egg, dip just the bottom third of your egg in dye. Wait two minutes. Dip it slightly deeper. Wait again. Keep going until the whole egg is submerged. The longer sections stay in the dye, the darker and more saturated they become. Pull the egg out slowly for a smooth gradient. This looks very polished for minimal effort. Works especially well with bold single colors like cobalt, emerald, or fuchsia.
10. Lace-Stamped Texture Eggs
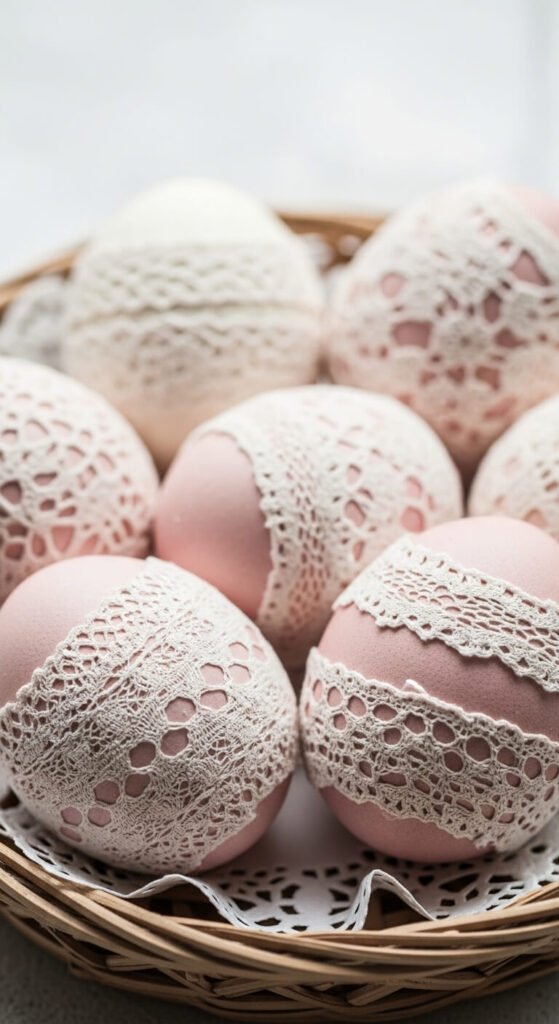
Cut a small piece of lace fabric and wrap it snugly around a raw egg. Secure it with a rubber band. Drop the wrapped egg into dye and let it sit for several minutes. When you remove the lace, the fabric pattern is left behind on the shell. Tighter weave lace gives crisper detail. Loose lace gives a softer impression. Thrift stores often sell lace trim for almost nothing, and one yard wraps dozens of eggs.
11. Black Chalkboard Egg

Coat an egg with chalkboard paint (available at craft stores for about $6 a bottle). Once dry, draw directly on the egg with chalk or a chalk marker. Erase and redraw as many times as you want. These make great name-card holders for Easter tables — just write a guest’s name on each egg. They also photograph beautifully with white chalk lettering against the black matte finish. Wipe clean with a damp cloth.
12. Tissue Paper Decoupage Eggs
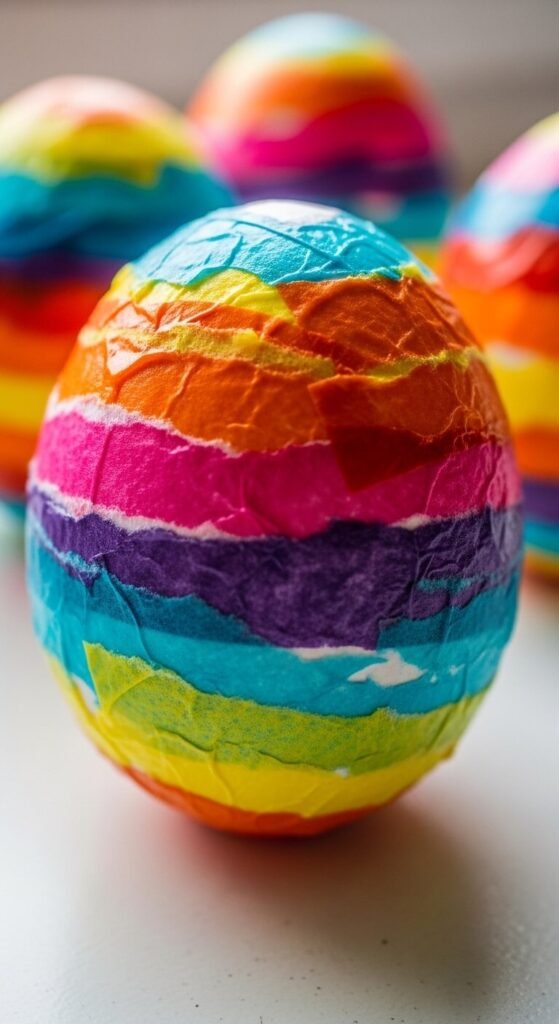
Tear tissue paper into small irregular pieces. Brush Mod Podge onto a section of the egg, layer tissue pieces on top, then brush more Mod Podge over them. Overlap colors for a stained-glass effect. The tissue becomes almost translucent when wet, creating rich, jewel-toned layers. This works great on white or blown eggs. It’s one of the most affordable options — a pack of tissue paper costs under $2 and covers a whole basket of eggs.
13. String-Wrapped Thread Eggs
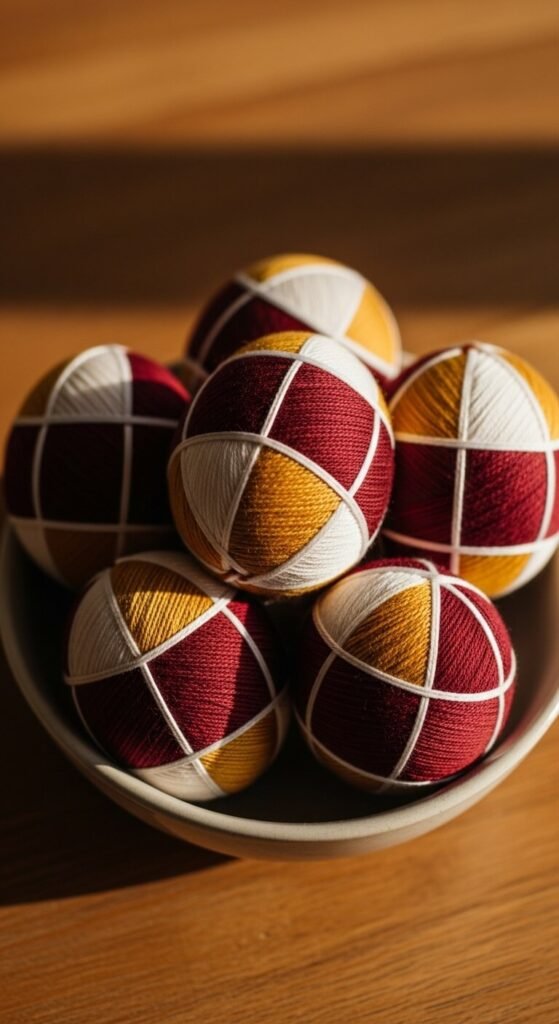
Apply a thin layer of white craft glue to a small section of the egg. Press embroidery floss or thin yarn onto the glue and wrap tightly, working in sections. Change colors as you go to create stripes, triangles, or random color blocks. Keep tension consistent for clean lines. This is a slow, meditative project that yields impressive results. A skein of embroidery thread costs about $0.50 at any craft store.
14. Splatter Paint Jackson Pollock Eggs
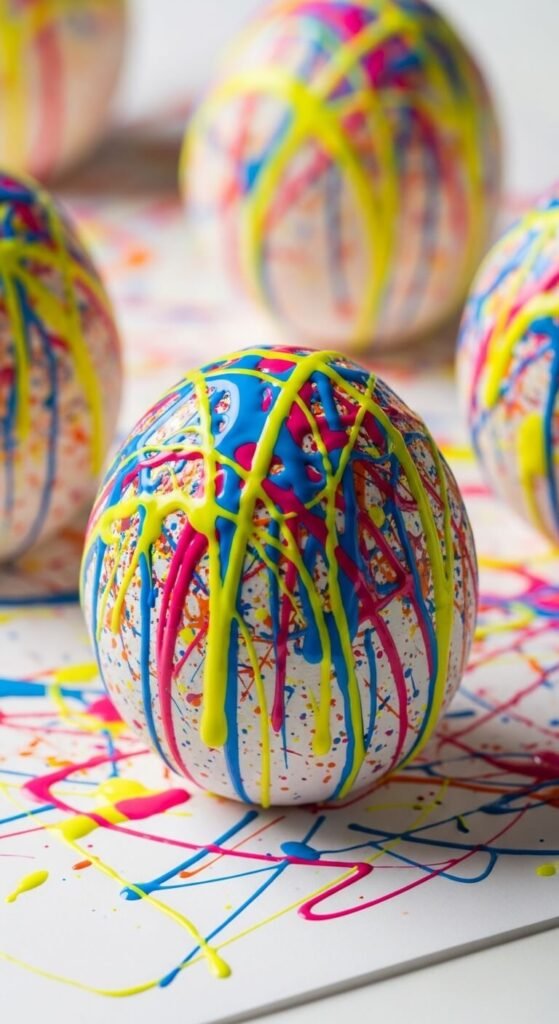
Thin acrylic paint slightly with water. Load a paintbrush and flick it toward the egg to create random splatter marks. Rotate the egg and repeat with different colors. Let each layer dry before adding the next. Place the egg inside a box or paper bag opening to contain the mess. This abstract style looks bold and modern. Black eggs with neon splatter are especially striking. Total cost: whatever leftover craft paint you have on hand.
15. Succulent Faux Planter Eggs
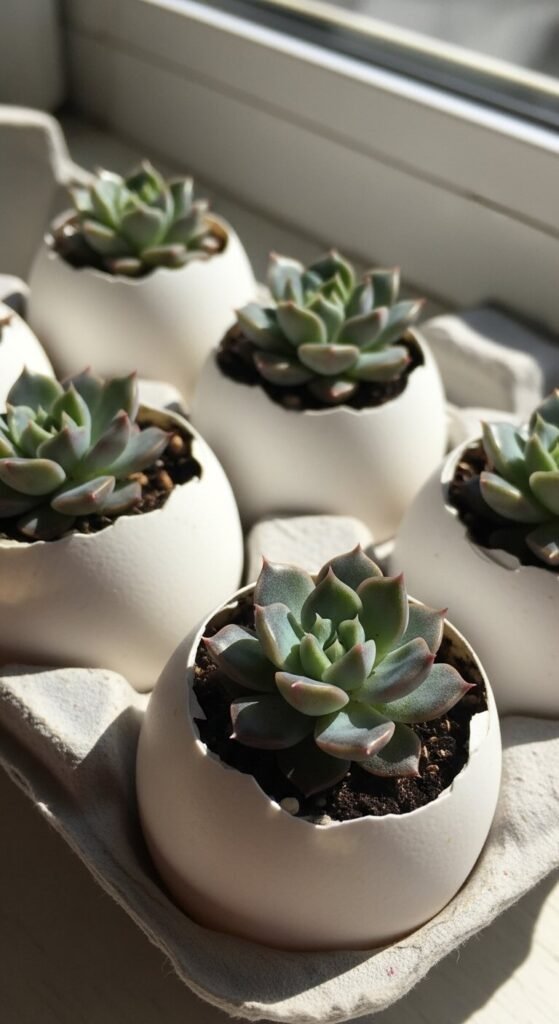
Carefully crack the top off a raw egg and empty the contents. Rinse the shell and let it dry. Fill the shell with a small pinch of potting soil and plant a tiny succulent cutting or small moss clump inside. Set the egg in the original carton to hold it upright. These look amazing as table centerpieces. Succulents are incredibly affordable at hardware stores — one $3 plant can be divided into many small cuttings.
16. Stamped Potato Print Eggs
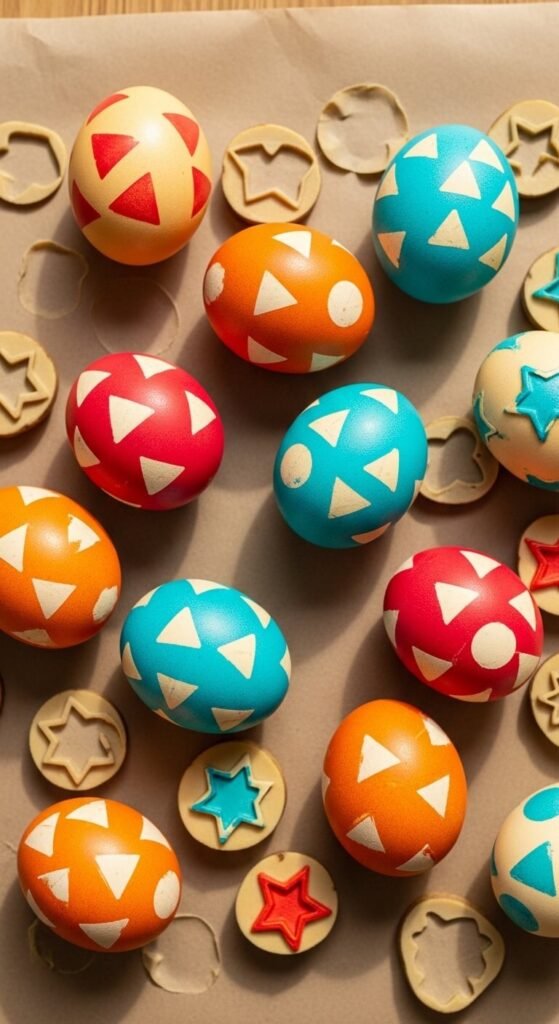
Cut a potato in half and carve a simple shape — star, heart, leaf, diamond — into the flat side. Pat it dry and press it into thick craft paint or ink. Stamp directly onto a dyed egg or a plain white egg. The soft potato creates a slightly imperfect, handmade-looking print. Stack repeat stamps around the egg in a ring pattern for a finished look. This is free if you already have potatoes and paint at home.
17. Galaxy Swirl Space Eggs
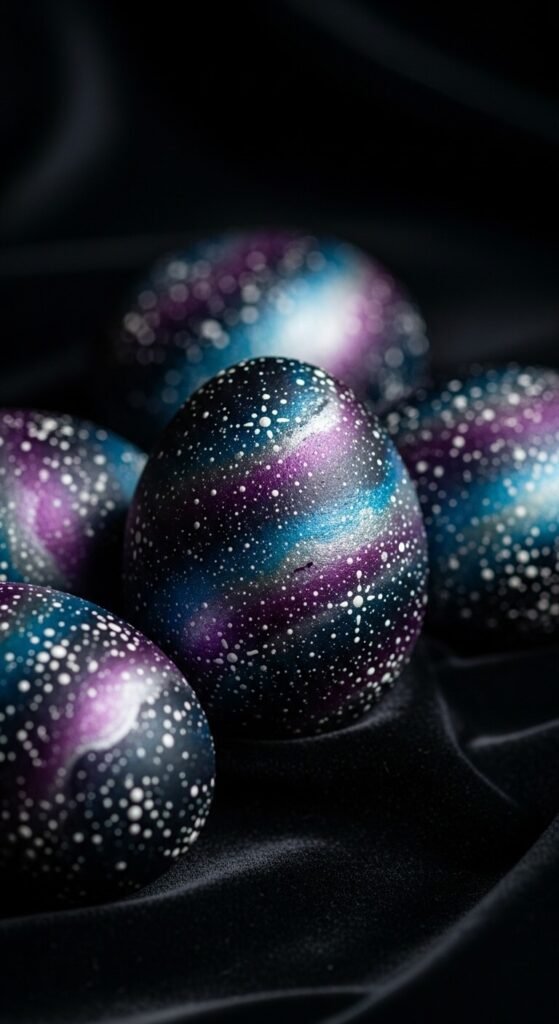
Paint the base of a blown or wooden egg matte black. Using a sea sponge, dab on layers of deep purple, cobalt blue, and dark teal — blending edges while still wet. Add small smudges of white or silver. Then use the tip of a fine brush to dot on tiny white stars. Finish with a light misting of silver glitter spray at one edge to mimic a nebula. These look genuinely breathtaking in a display bowl.
18. Minimilist Single-Line Drawing Eggs
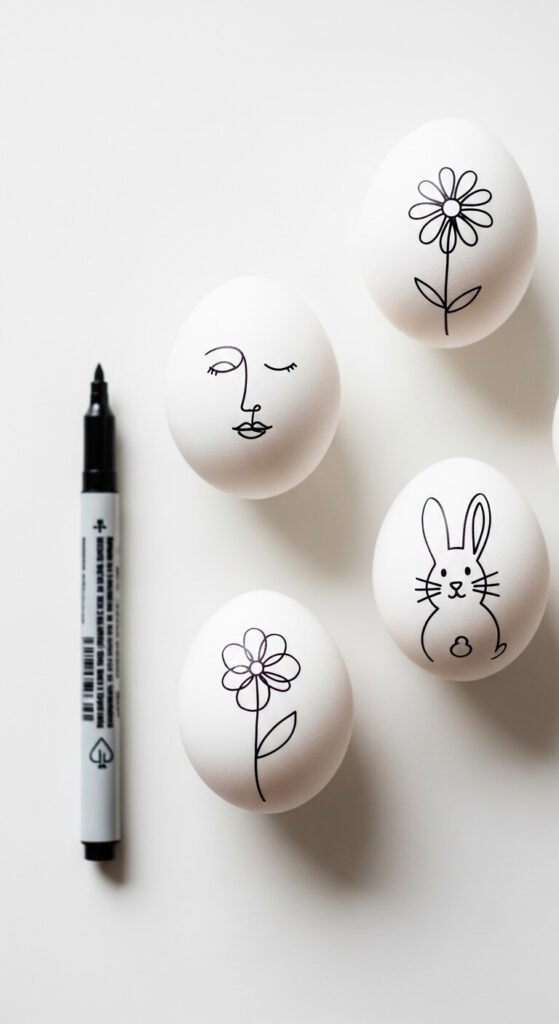
Grab a fine-tip permanent marker and draw a single unbroken line across the egg to create a simple image — a face, a bunny, a floral sprig. The “one line” art style is forgiving because imperfection is part of the aesthetic. Plan your design loosely first on paper. Simple, abstract, and fast. These look incredibly chic displayed in a white bowl. Zero supplies needed beyond a marker you already own.
19. Dried Herb & Spice Texture Eggs

Place a sprig of fresh herb (thyme, fern, or parsley works well) flat against a raw egg. Wrap the egg tightly in a thin piece of nylon stocking and tie it off. Drop it in onion skin dye or standard dye. The herb blocks the dye and leaves a perfect silhouette of the plant on the shell. Remove the stocking after dyeing and peeling back the herb reveals a beautiful natural print.
20. Shibori-Inspired Indigo Eggs
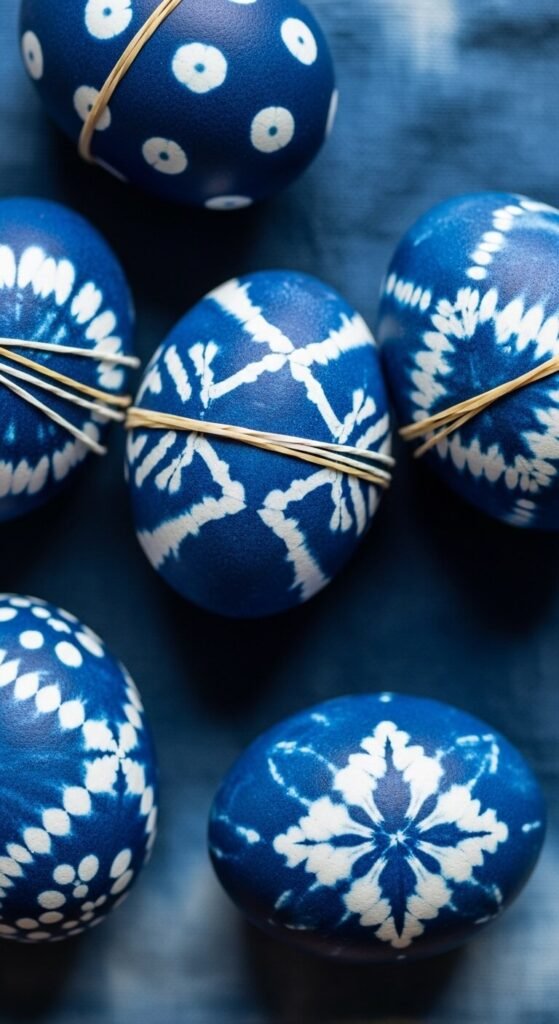
Take inspiration from Japanese shibori dyeing by binding sections of the egg tightly with rubber bands, string, or small clips before dipping in dark blue dye. Each binding method creates a different pattern — rubber bands make lines, bunched string makes organic wrinkles. Deep indigo or navy dye gives the most dramatic result. The contrast between white resist areas and dark dye is striking. This is a simple technique that looks very intentional and artful.
21. Painted Zodiac Symbol Eggs
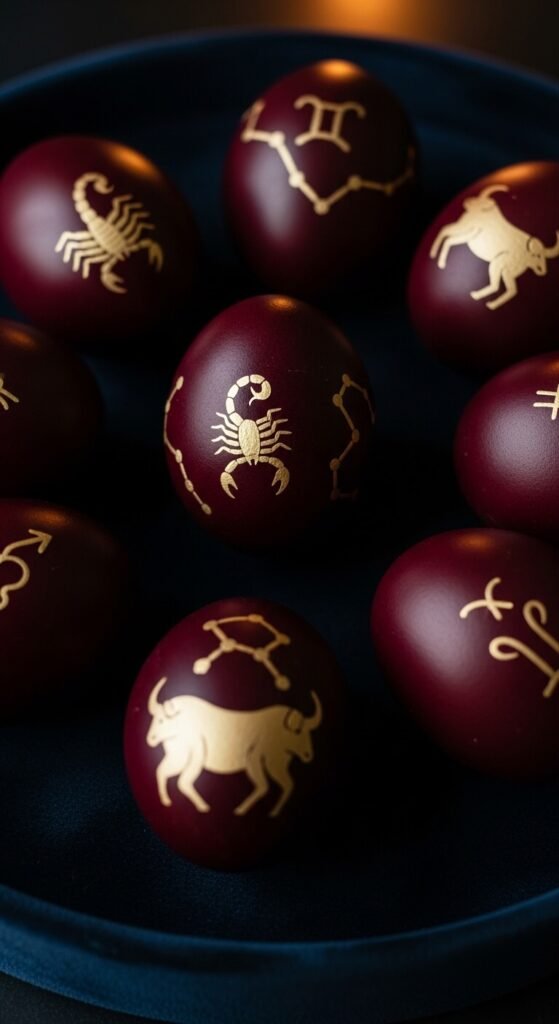
Use a fine liner brush and gold acrylic paint to paint a small zodiac symbol or constellation on each egg. You don’t need to freehand it — print reference images and use them as guides. Paint your family’s signs and use the eggs as personalized place cards. Dark-dyed base eggs in burgundy or forest green make the gold detail pop beautifully. These feel personal and thoughtful without taking a lot of time.
22. Comic Strip Decoupage Eggs
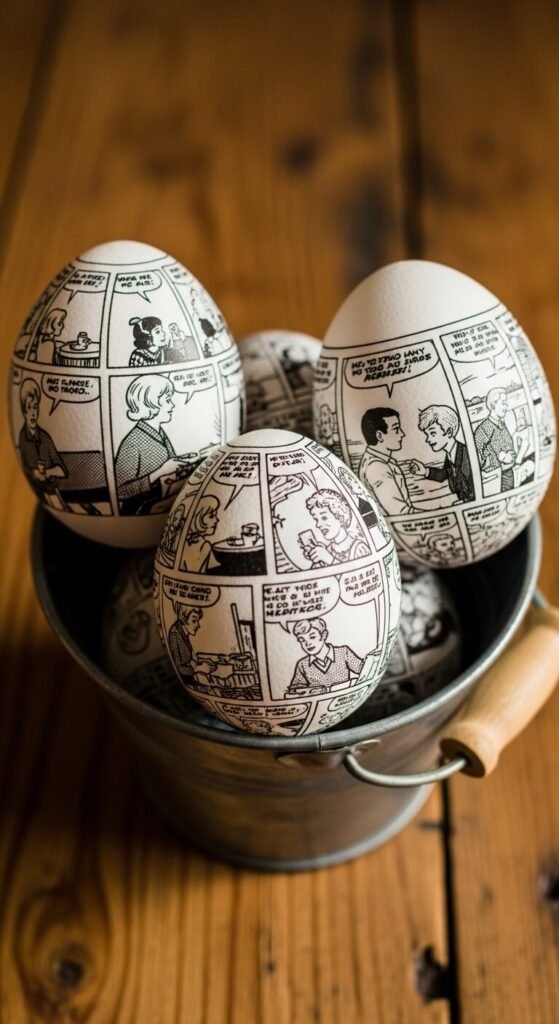
Cut out panels from old comic strips, black and white newspaper print, or pages from a vintage book. Apply Mod Podge to the egg, press paper pieces on, and seal with another coat. Overlapping sections look intentional, not messy. Black-and-white newsprint on a white egg has a very editorial, modern look. You can also use pages from old music sheets or maps for a completely different feel. Totally free if you have old papers at home.
23. Egg With Sticker Mosaic
Buy a pack of small round office dot stickers or gem stickers from the dollar store. Place them one by one across the surface of the egg in any pattern — stripes, sunbursts, concentric rings, or totally random. Press each one flat. Cover the entire egg surface or leave white space between for a more minimal look. This is a no-mess, no-skill craft that even very young kids can do. A pack of stickers costs $1–2 and covers a dozen eggs.
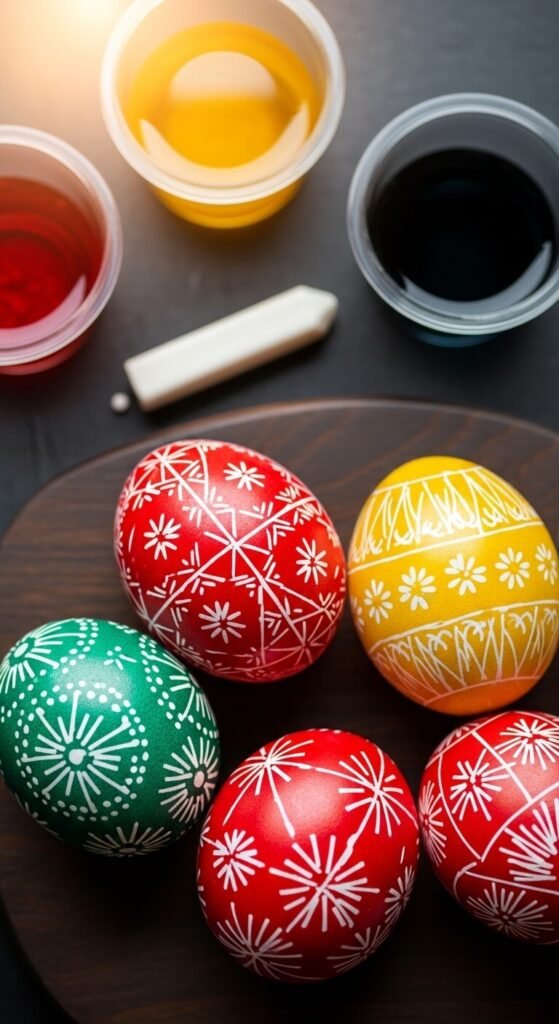
24. Batik-Style Hot Wax Eggs
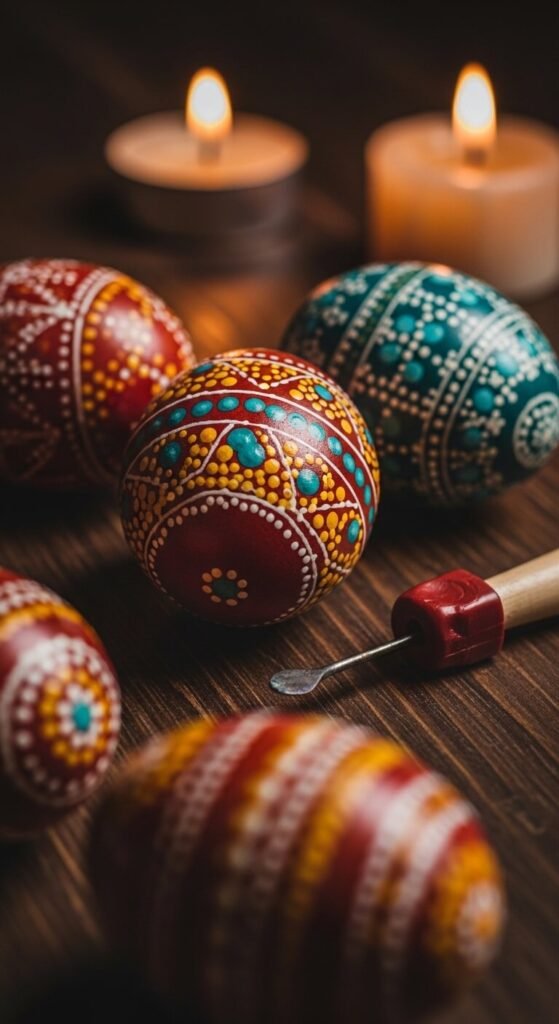
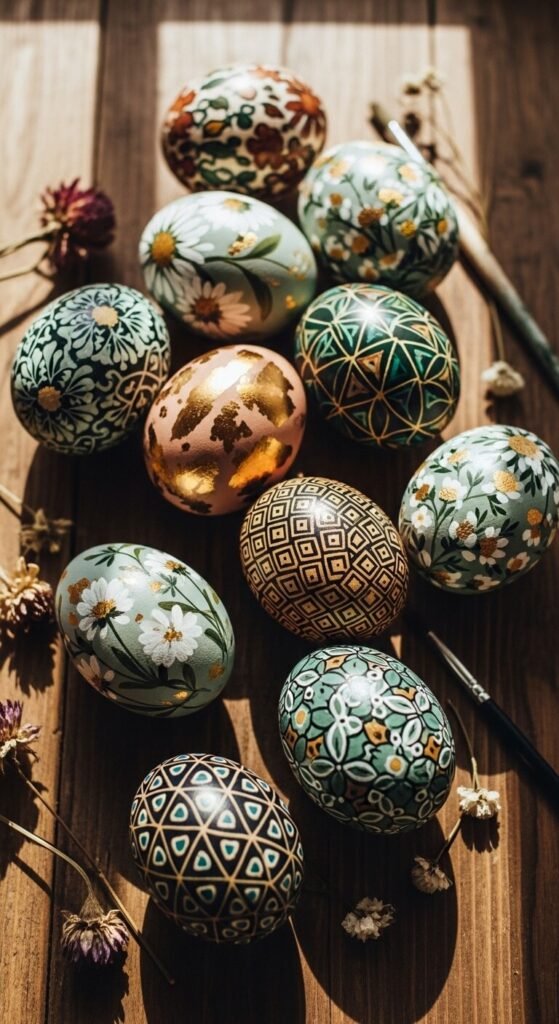
This is an advanced version of the crayon wax resist method. Melt beeswax in a small metal spoon over a candle. Dip a toothpick or small stylus into the wax and draw dots, lines, and patterns on the egg quickly before the wax cools. Dye the egg, then melt the wax off near a candle flame. Repeat with different dye colors for layered results. This traditional Ukrainian pysanka technique is time-consuming but produces genuinely stunning eggs.
25. Egg Geode With Epoxy Resin
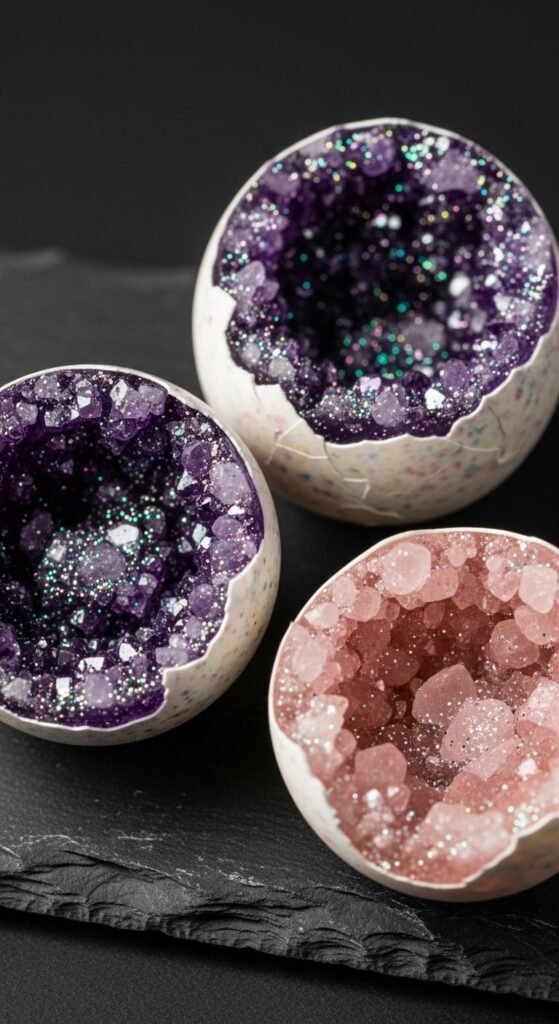
Crack open a blown egg shell along the middle, creating two halves. Mix clear epoxy resin with a small amount of glitter, crushed glass beads, or colored pigment. Pour it into the shell halves and let it cure for 24 hours. Add extra crystal pieces on top before it fully sets. The finished result looks like a split geode rock. Display them open-face on a shelf. Resin kits start around $12 and can fill many egg halves from one batch.
Conclusion
You don’t need expensive kits or professional skills to make beautiful egg decorations. Most of these ideas use supplies you probably already have — rubber bands, markers, nail polish, tissue paper, or washi tape. The key is giving yourself permission to experiment. Some attempts will turn out perfectly. Others will be happy accidents that look even better. Start with whichever idea caught your eye first, gather your supplies, and set aside an afternoon to create something you’re genuinely proud of. Your decorations will look anything but basic.