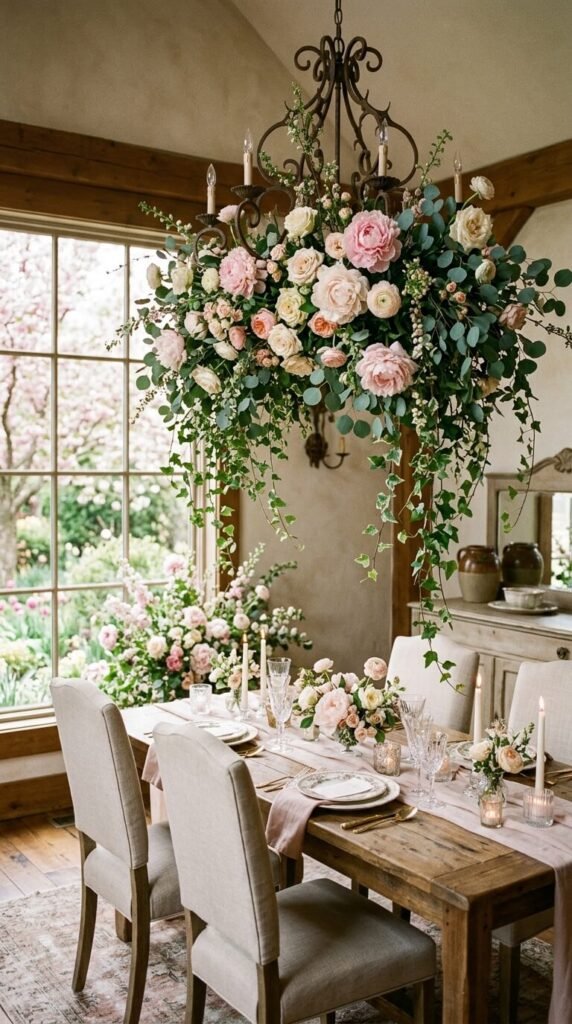
Imagine walking into a room and being stopped in your tracks by a stunning floral chandelier dripping with fresh blooms, trailing greenery, and soft pastel ribbons swaying gently overhead. That’s exactly the kind of magic a spring chandelier garland can bring to your home — and the best part? You don’t need a florist’s budget or professional skills to pull it off.
Whether you’re decorating for a spring dinner party, an Easter brunch, or simply refreshing your everyday space, this project is one of the most breathtaking DIY upgrades you can make. Let’s walk through exactly how to do it.
What You’ll Need
Before you climb a single ladder, gather your supplies. Having everything within reach makes the process so much smoother.
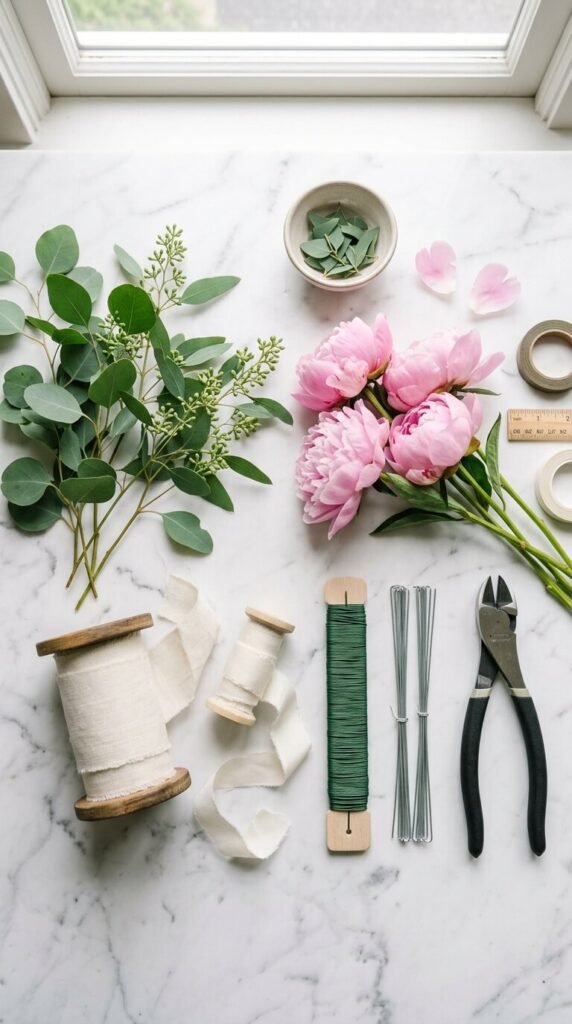
Florals & Greenery:
- Faux or fresh peonies, ranunculus, or tulips in blush, white, and soft lavender
- Eucalyptus stems or trailing ivy
- Baby’s breath or small filler flowers
- Jasmine vine or wisteria sprigs for a whimsical drape
Tools & Base Materials:
- A length of grapevine or wire garland as your base
- Floral wire and green floral tape
- Thin ribbon in ivory, blush, or sage green
- Wire cutters and scissors
- A sturdy step stool
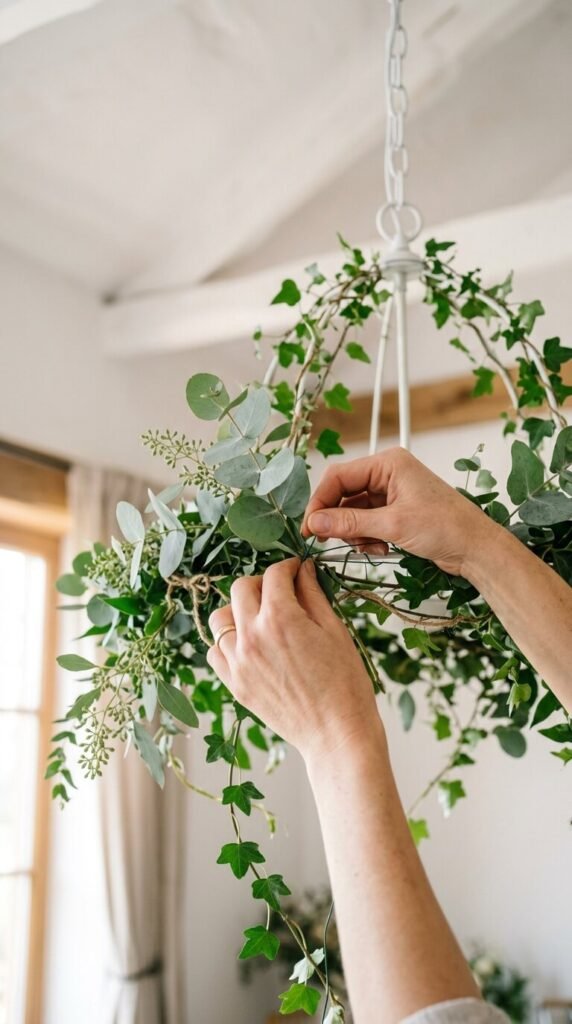
Step 1: Build Your Garland Base
Start with a grapevine or wire garland that’s long enough to drape generously around your chandelier. You want it to hang naturally with a slight cascade — not pulled tight.
- Measure your chandelier’s diameter and add at least 18–24 inches on each side for draping
- Loosely wrap the base garland around the chandelier frame, securing it with small loops of floral wire at several points
- Don’t worry about it looking perfect yet — you’re just building the skeleton
The base should feel secure but still have movement. A stiff, flat garland won’t give you that lush, romantic look you’re going for.
Step 2: Add Your Greenery First
Think of greenery as the foundation that makes your florals pop. Always layer greenery before adding any blooms.
- Cut eucalyptus and ivy into 6–10 inch sections
- Tuck and wire them into the base garland, alternating directions so the greenery flows naturally
- Let some stems trail downward — this creates that gorgeous cascading effect
- Fill any gaps so there’s no visible wire or base showing through
Step 3: Place Your Statement Blooms
Now comes the really fun part. Your larger florals — peonies, ranunculus, garden roses — are the showstoppers. Place them intentionally, not randomly.
- Work in clusters of 2–3 blooms rather than spacing them evenly around the whole garland
- Position your largest, most open blooms at the lowest point of the drape where eyes naturally land
- Use floral wire wrapped with green tape to secure each stem tightly
- Step back frequently to check the overall balance from across the room
A good rule of thumb: place one cluster at the very front center, then mirror smaller clusters at the back and sides. This gives the garland a full, intentional look from every angle.
Step 4: Fill In with Smaller Details
The small details are what take a garland from “pretty” to absolutely stunning.
- Weave in baby’s breath or small white blooms to add softness and texture
- Add jasmine or wisteria vines for long, trailing movement
- Cut ribbon into 12–18 inch lengths and tie loose, airy bows directly onto the garland frame at two or three points
- Tuck in a few individual petals or leaves into any remaining gaps
Tips for Making It Last
- Use faux florals if you want the garland to stay gorgeous all season long without wilting
- Mist fresh florals lightly each morning to extend their life by a few extra days
- Avoid direct sunlight — it will fade and dry out fresh blooms quickly
- Store faux garlands loosely wrapped in tissue paper for next spring
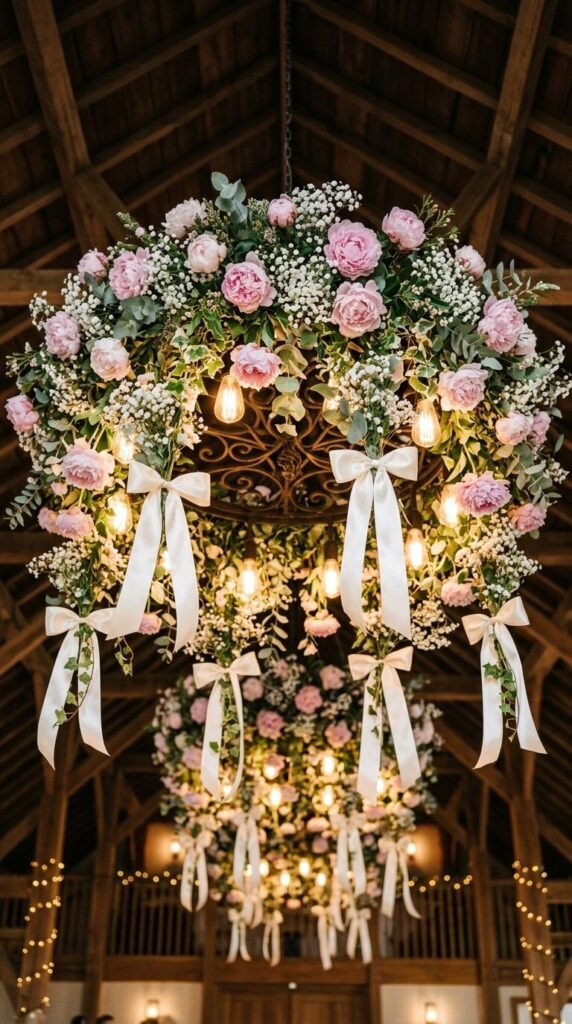
Go Ahead — Make Your Chandelier the Star
A spring chandelier garland is one of those projects that looks incredibly complex but is genuinely achievable in an afternoon. Once it’s up, it transforms an entire room — and trust us, every single guest will ask you about it.
Save this to your spring décor board and come back to it every year. Once you make one, you’ll never want a bare chandelier again. 🌸